Starting Seeds Indoors
Starting Seeds Indoors can be as Simple or as Complicated as you Like
Where winters are long the growing season is short, and we don’t always have enough time to plant vegetables, annuals or perennials from seed. By the time the plant sprouts, grows, and begins to produce the growing season is over. And from a cost standpoint, seeds are substantially cheaper than plants, allowing you to really be frugal whether you are growing annuals, perennials or fruits and vegetables.
Starting seeds indoors can be done with virtually no special equipment. And most seeds will require little or no special knowledge to sprout. Eventually you may get really serious about your seed starting in winter and choose to invest in special grow lights and try growing some of the seeds that are difficult to germinate. You will also find that seeds are available for a wider variety of plants, many of which are expensive or are difficult to find as a plant. Start simple though, and see how you feel about the project before you invest too much time or money.
What you Need to Get Started

First you need a container of one sort or another to plant the seeds in. Check out your local garden center and you will find a variety of containers perfect for seeding. Prices vary dramatically so consider how much convenience you want or need. There are trays of small plugs that may be pre-filled with an appropriate seeding medium, not necessary soil. Seeds don’t need soil to germinate. If you choose empty plug trays (called cell flats) to fill yourself, you will need a seed starting mix - NOT potting soil! You can make your own mix if you prefer, it will not necessarily be cheaper because of the volume of material necessary to buy. A basic recipe is four parts screened compost, 1 part perlite, 1 part vermiculite and 2 parts sphagnum peat moss. Lightly moisten the ingredients to mix it up without creating a lot of dust.
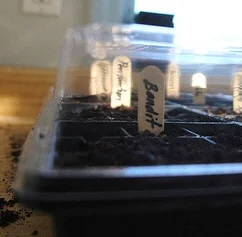
The preformed plugs or cell flats are meant to germinate and sprout your seeds. They will eventually need a larger container to develop in but they also come with a solid tray and domed cover which is convenient. Or you can germinate directly in larger containers such as commercial peat pots, fiber pots, yogurt cups or milk cartons with drainage holes. Peat and fiber pots can be planted directly into the garden when the time comes. These can be set in a tray of any sort available to you. The tray will allow you to water from the bottom by simply pouring water into the tray. This will also prevent dislodging delicate sprouts by pouring water into the pot. You will also need some sort of cover to hold moisture so your seeds remain constantly moist, but not wet, while germinating. And the seedlings will require plenty of moisture too. If your tray is deep enough you can cover with saran wrap and poke a few holes in it to provide air for the seedling.
Be sure to label everything. Either mark the individual seed pots or use markers. It is very frustrating when it comes time to plant and you have no idea which plants are which. Some will look very similar, some you will come to recognize easily with experience.

Now you need a warm spot to place your trays. 70 degrees is ideal, if you don’t keep your house that warm you may need a heating pad. You will also find these at your local garden center. Some seeds will germinate fine at lower temperatures, but some will require the heat.
Caring for the Seedlings

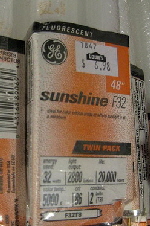
Once the seeds sprout and you see tiny seedlings, they need light, air and nutrients. Move them near a sunny window for light, but you will likely need additional light for them to grow well. A basic flourescent light with two cool white tubes will do the trick, buy a fancy grow light if you choose. A flourescent light (48” shop light is inexpensive) should be hung in such a way that it can be raised as the plants grow. Start with the light 3-6 inches above the sprouts so they don’t get long and spindly reaching for light. And turn the light off every night, plants need a dark cycle just like they would experience outside. Leave the heating pad on at night to keep temperature constant. Leave the cover on until everything has sprouted, then remove the cover immediately to prevent mildew. I have started seeds in a sunny window near a heat vent with no added source of heat or light. Heavy window coverings shielded them from cold overnight. For the seeds I was starting that was fine, but there is more loss of seedlings since they don’t tend to grow as strong. Depending on what your are growing, you may need to experiment some.

All seedlings look pretty similar at first, with two simple leaves. Eventually they produce true leaves which usually look quite a bit different. Once two sets of true leaves form they will need more space and some food. Water the seedlings at least a couple hours ahead, and then move them to a new home. Each seedling should be removed from the plug pot and planted into a 3 x 3 or 4 x 4 pot with drainage holes (reuse well cleaned and sterilize pots from the garden center, yes - the little plastic pots you bought annuals in!). This time you can use standard potting soil. The little seedlings are pretty delicate, so use a spoon or similar implement to carefully scoop them out with all the root and as much of the seeding medium as possible, and place in a container half filled with potting soil. While supporting the seedling gently by holding the leaves not the delicate stem, fill the rest of the container with potting soil.

Your seedlings need tons of light now, a south facing window is best and supplemental light will still be important. So keep the flourescent light in place but raise it so it remains 3-6 inches above the plants. Turn the tray or pots frequently so they are evenly getting the natural light. Do keep in mind that it is cold near a window! You will likely need that heating pad. You should continue to water from the bottom by adding water to the tray, but you can add fertilizer now. Be careful not to overwater, if the soil is waterlogged there is no room for air, which is important for the seedling’s roots. Use a weak solution of water soluble all purpose fertilizer weekly, mixed at about one quarter recommended strength. If additional moisture is need, use just water.
Seedling Problems
Seedlings get long and spindly - they need more light. If they are not in a south facing window, move them. If you don’t have a flourescent light installed, get one. If your flourescent light just isn’t enough for certain plants, get a wide spectrum grow light. Be sure to leave your light on until late in the evening, 12 to 16 continuous hours. It may be dark outside now, but if your seedlings were growing outside in the summer, the days would be much longer.
Seedlings are pale or yellowing - they need more light. Same as above.
Seedlings suddenly fall over and die - this is called damping off, generally due to fungus. You may be overwatering and keeping the soil too moist, or watering overhead by sprinkling so the foliage stays wet too long. If you did not transplant the seedlings from their plug cells into larger pots, they may be overcrowded. Or perhaps damping off has occurred before the true leaves have formed, then you may need to at least thin the seedlings. If you have begun fertilizing, stop until the plants get stronger. Setting up a fan that blows VERY gently can improve air circulation and minimize moisture on the seedlings.
Too many sprouts - If you have over seeded, under estimated germination rates, or accidentally dropped several seeds into one pot or cell, your seedlings will be crowded. Thin by selecting the weakest plants and simply cut off at soil level. You will not be able to separate them without damaging the roots.
Seeds won’t sprout - Certain seeds need to go through a winter before they will germinate. If you are using collected seeds make sure you find out before trying to germinate them. Purchased seeds are generally ready to germinate. It is also possible you are not providing enough or constant moisture. Or, they seed may simply not be fresh or germination rate is simply low for the particular seed. Also be sure to plant according to seed pack directions. Some seeds should not be buried at all but simply lay on the soil surface.
Pinching
Certain plants should be pinched off to encourage side shoots instead of additional height. Pinching is simply snapping or squeezing off between your finger tips the tip of the seedling. Herbs in particular should be pinched since you are growing them for the foliage. Flowering plants that are meant to be bushy and covered with blooms such as petunias, impatiens, dianthus and dahlias, should be pinched. Also plants grown for their colorful foliage such as coleus. Flowers meant to be tall with large blooms should not be pinched as you will remove the primary bud.
Hardening Off
Once the seedlings are large and healthy (similar in size to what you are used to buying at the garden center) they need to be hardened off. This is simply slowly acclimating them to an outdoor environment. Set the seedlings outside for a few hours for several days in a row, placing them where they will be protected from wind and direct sunlight. Start them in the warm late morning, then try to put them out in the warmest part of the day. Gradually increase the time outside and the direct sunlight exposure, and finally place them in the garden where they will be planted for an entire day. This process should take place over about 2 weeks. Then add a night and then two nights. Now they should be ready to transplant, but only if all danger of frost has passed! Certain plants are highly resistant to transplanting. Even if you grow them indoors successfully, they may die shortly after you plant them in the garden. These include dill, cilantro, melons, cucumbers, beans, carrots, parsley, corn and poppies. But these all grow easily and quickly from seed right in the garden, so don’t bother with seeding them indoors.
Planting Seedlings in the Garden
You are ready to plant your seedlings in the garden when any danger of frost has passed. Make sure the soil is prepared ahead of time with any compost, composted manure or peat moss thoroughly dug in as necessary. Plan your spacing carefully, these seedlings are small but the plants will mature immensely larger. Cut peat pots back to soil level before planting to prevent moisture from wicking out of the soil. Plant your seedlings deep, up to or nearly up to the first set of leaves (check planting instructions for individual plants, this is not always recommended). Water soil well using a drip or soaker hose so the seedlings are not damaged by overhead watering and to minimize moisture on the foliage. Expect some wilting in the first few days, they will recover. Do not over react and water or fertilize, this will do more harm them good. Leave them alone for a few days, they’ll be fine.
What Should be Started Indoors?
Let’s start with what should not, those plants that are best sown directly into the garden outdoors. Most vegetables should be started right in the garden, including peas, beans, corn, carrots, spinach, radishes, cucumbers, melons, squash, and lettuce. Most annual flowers should also be direct sown including asters, sunflowers, nasturtium, cornflower, calendula and zinnia. If you use peat or fiber pots that break down in the soil, they can be planted directly into the garden, pot and all. This eliminates the transplant shock problem.
Most perennials should be started indoors, but this is largely a personal preference. I prefer to start mine outdoors, either directly where I intend them to grow or perhaps in a “nursery” of sorts (really nothing more than a small section of the garden where I can easily and frequently tend to seedlings). But most perennials will NOT flower their first year when sown directly in the garden, there simply isn’t enough time for the plant to fully develop. If you give them a head start inside, they should bloom their first year in the garden.
When to Start Seeds Indoors
Most seed packets should indicate something like “start 6 weeks before the last frost date”. Some may only say something like “germinates in 7-10 days”, in which case you should take that germination period and add 6 weeks. If there is no information at all, start the seeds 6 weeks before your frost free date. If at all possible, start each seed or group of seeds at the appropriate time. Cool season vegetables such as chives, onion, and broccoli are generally planted early and therefore can be started ahead of warm season vegetables such as tomatoes and peppers as well as annuals and perennials. Slow growing plants such as parsley, thyme, tarragon, geraniums and sage can also be started quite early. If you grow your seedlings in a vary warm, or a cooler environment, you may want to adjust by one week appropriately. For example if you have a greenhouse, start seeds a week later than normal. The heat will accelerate growth. Or if you have a cold frame to transplant into, you can also start seeds early by as much as 3 or 4 weeks. Be sure to keep a journal of all the details so if you need to adjust next year you will remember.
Buying your Seeds

Seeds are available in garden centers, home improvement stores, mail order catalogs, internet order, even discount and grocery stores. Prices may vary dramatically, but if you are buying an off brand, just be sure the botanical name is IDENTICAL to what you want in a name brand. Law dictates that they will be the same purity and the same percentage of germination. However, a seed packet of “coreopsis” is very generic and is likely the species plant rather than a named cultivar or hybrid. There is nothing wrong with a species plant, in fact they are often the more hardy and prolific, but just be sure that is what you want. Price will also vary based on the quantity you buy. A packet of ten seed will be more expensive per seed than a packet of 50. But buying ten seeds is probably most economical since you wont plant 50. Seeds germinate best when fresh and you may waste many in the end. Leftover seeds can be saved in an airtight container in the refrigerator for up to three years. Seeds for new introductions and rare plants will logically be more expensive.
Cleaning your Containers
Just do it now, then it will be all ready for you next spring. The cell flats are reusable as are the larger plastic seedling pots or recycled pots from the garden center. But they must be rid of pathogens that could be present. Clean them thoroughly. Then sterilize them by soaking soaking in a bleach solution for 30 minutes. Rinse thoroughly, dry completely, and store them.