Detailed Special Instructions for Planting a Tree
The instructions for planting a tree may need to be adjusted for certain types of nursery stock. These additional details and rules of thumb will help you to determine what adjustments to make.
What is the difference between container grown, balled and burlapped and bare root trees?
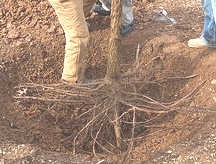
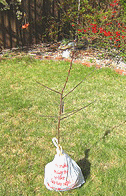
A bare root tree has no soil at all around its’ roots. It has been removed from the soil while still dormant, and all soil removed from its’ roots. They are generally kept dormant by refrigeration until sold. Typically bare root are available until just after the frost free date in your region. After that, if there are any left the nursery will pot them up, let them break dormancy, and sell them as container grown. Bare root trees, shrubs and roses are often quite a bit less expensive than any other type. Bare root requires special care in preparing to plant, see the instructions later in the page
B&B, or balled and burlapped, are dug out of nursery ground and wrapped in burlap until sold. This is the standard means for a tree larger than one that can be kept growing in a container but still can be managed by homeowners or landscapers. (Full grown trees must be dug managed mechanically with a truck mounted tree spade.) It is critical that the root ball not be allowed to dry out. Make sure you are getting a native soil B&B, which means it is wrapped with the soil it originally grew in. The soil and root mass will be quite firm. A “manufactured ball” is dug up, placed on a wrapping, and new soil is added. The soil and root mass, or “ball”, will be quite loose and wiggly. These are extremely difficult to keep moist, and root damage is likely to occur making transplant success less likely.
Container grown trees were originally planted in the container when very young. The root system remains intact until you plant it, inflicting none of the stress endured by being dug up and the roots cut and exposed. This gives container grown trees a slight advantage for a successful transplant. However, a tree growing too long in its’ container may become root bound, with the roots growing round and round in the container. The roots will need to be spread out, most likely will need to be cut to accomplish that. The roots will recover, but the tree has lost the “container grown advantage”.
How do I plant a bare root tree?
Most of the planting procedure is essentially the same, but special care needs to be taken when the roots are exposed. Here are some important tips:
Make sure the roots are protected in transport. The roots and wet mulching material should be covered in plastic to keep them moist and sheltered from drying wind.
If you received a bare root tree by mail order the roots will be packed in a box full of damp mulching material. Leave them packed and keep them wet until you are ready to plant. If you picked up the tree from your nursery, pack the roots and wet mulching material into a plastic bag and close the top around the trunk. Store only for short periods in the garage or in the shade until ready to plant, keeping the mulching material wet.
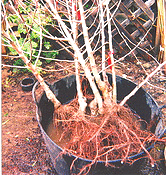
For 3 to 6 hours prior to planting, soak the roots in a bucket of water. Make sure the roots are fully emersed. If the roots are wide and flat, try to find some type of flat basin or dog washing tub that will accommodate the roots without crushing them.
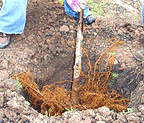
Dig the hole much wider than seems necessary. Make sure there is plenty of room to spread the roots out completely without crowding them. DO NOT stuff the roots into a too small hole. This will make it difficult for the roots to establish and anchor the tree.
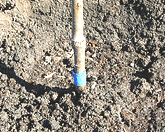
The planting depth on a bare root tree is not as evident as a container grown or B&B tree. Before you begin your planting, examine the trunk to determine the soil line. The portion of the trunk that was originally below ground before it was dug up will be discolored, often darker. Mark the soil line with colored tape, the bottom of the tape at the top of the soil line. When you complete planting, the tape should still be visible.
When your hole is prepared and you are ready to plant the tree, the only thing different is preparing a mound of soil for the roots to rest on. Just pile up a “cone” of soil in the center of the hole. Place the trunk on the top of the mound and spread the roots out over the mound. Begin back filling, soaking and tamping the soil frequently as you fill the hole.
Some bare root trees have difficulty breaking dormancy after long periods of refrigerated storage. Your nursery may advise you to “sweat the stock” if the variety has been known to have difficulty. Normally this is done by potting the tree and placing it in a greenhouse until the buds swell. To sweat nursery stock at home, cover the entire plant roots to tip with wet packing or mulching material, wet newspaper works fine. Then cover or wrap it in a wet sheet. Finally, cover or wrap it in plastic. Store in the shade or in a garage. Check the buds every day, but it may take several days. I have, with a tree not known to be difficult breaking dormancy, just covered the tree top with a plastic bag, enclosing it around the trunk, while soaking the roots in a bucket of water. It worked just fine, and in three days the buds began to swell. If you plant your tree not anticipating it would have difficulty breaking dormancy and the buds have not swelled in 2 to at most 3 weeks, sweat it in the ground. Enclose the tree top in a plastic bag (use white, black may trap way too much heat in the sun) and close it off at the trunk. After the first couple of days, absolutely open the bag every day to check the buds. You will allow some important air circulation and allow excess heat to escape if it is in direct, warm sunlight.
Certain trees or shrubs are known to have difficulty breaking dormancy and should be sweated as a matter of routine. They include Birch (Betula), Hawthorne (Crataegus), Hackberry (Celtis), Juneberry (Amelanchier), Mulberry (Morus), Oak (Quercus), Potentilla (Cinquefoil), and Redbud (Cercis).
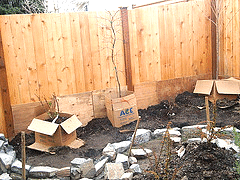
Sweating stock is most effective once early spring has turned warm, around 60-70 degrees. You may want to heal in your bare root stock if you have purchased them in very early spring, when temperatures are still in the 40s and 50s. Healing in is simply a temporary potting up of the plant. Since gardeners heal in a plant before the soil and air temperatures are warm enough for growth to begin, a healed in plant can be stored in the garage, in the shade, or a sheltered spot. The picture above is an ingenious method of healing in “in place” while a garden bed is built up around the bare root trees and shrubs. Once the bed is complete and the soil and air temperatures begin to warm, sweating can be done “in place” also, if necessary.
Should I stake my new tree?
If your tree is less than 6 feet tall or the trunk is less than 1 inch diameter, you should not stake it. Roots begin to establish fairly quickly and will be able to support the small mass of the tree in the wind. If the tree begins to tip, or if excessive swaying of the tree opens up a hole in the soil around the base of the trunk, it may need the additional support of staking. If the swaying continues, it continually breaks off small root hairs trying to form and anchor the tree, thus delaying the root growth and anchoring.
Larger tree stock may have a root mass smaller than the mass of the tree top, and will have difficulty supporting itself until the root mass grows and anchors. Trees up to 4 inch diameter can be adequately staked with readily available materials. Trees larger will require eyebolts screwed into the trees - you may prefer to leave that to the service you probably needed to plant such a large tree. Staking should be done at the time the tree is planted.
Use 3 stakes for each tree, which can be wood, steel posts, pipes or rebar. Stakes should be more than one third the total height of the tree. Tying material comes in direct contact with the trunk and can cause damage to the trunk and bark. Select a tying material that is wide and smooth to minimize damage. Commonly used materials that minimize damage are nylon stockings, wide rubber belts, and elastic webbing. Do not use wire or string, they will cut into the bark. Wire or string run through a piece of garden hose or plastic flexible tubes available in staking kits are “OK”, but not as good as the softer, wide materials first mentioned.
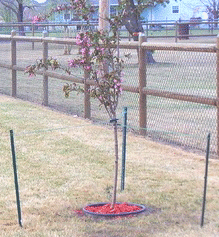
Drive the stakes 2 feet into the ground, spacing the three stakes evenly around the tree. Fasten the ties to the tree only one third up the total height of the tree. Do not completely restrict movement of the tree, some swaying and movement is important to developing strong wood strength in the trunk. Ties and stakes can usually be removed after the first growing season. Large trees may need staking for 2 growing seasons.
Should I add anything to the soil or use enriched top soil to fill the hole when I plant a tree?
Current wisdom is that no amendments should be added to the soil at all. The tree needs to adapt to its’ conditions. Heavily amended soil will cause the roots to “stay in the hole” rather than spread, grow, and anchor your tree. If your soil is heavy clay or sand, mixing peat moss into the soil will aide drainage for clay, and help sand to retain water.
There are a few other exceptions to amending soil, but NEVER REPLACE the soil, only add and mix in essential improvements to it:
If you are planting fruit or nut trees, it is very important to dig in large amounts of compost and or manure. The requirements for these trees are more demanding than a standard shade tree or ornamental tree.
If soil is extremely poor and completely devoid of topsoil and nutrients, you should amend the soil of an area substantially wider and deeper than just the planting hole itself. This may sometimes be the case in a new development, and if you hope to grow much of anything on the property, large amounts of topsoil should be brought in. Planting areas should be enriched in a large area with compost and thoroughly cultivated. Garden beds, of course, will need substantially more.
If you are planting a small ornamental tree or shrub, you should be able to amend the soil in a large enough area to accommodate the full size root growth. Do make sure you dig a large enough hole then to amend a wide expanse of soil. This is easy enough to manage if you have selected a small specimen tree that will not thrive in the soil conditions of your property. You can add enriched soil, compost, adjust the pH, and adjust mineral contents of the soil. Do not expect a large tree to thrive once it’s roots move beyond the amended hole. In fact, the roots probably will NOT move beyond the amended hole. The tree then may not be able to take in enough water and nutrients, will become weak, and may be pulled from the soil in high winds without expansive and deep anchor roots.
Although selecting a tree that thrives in your growing zone and soil conditions, ideally trees native to your specific region, is ideal, we are sometimes a little adamant that we really want “that” tree, or that we can nurture it to thrive. If you must try, figure out what is essential to the tree that your soil is lacking. Get a soil test kit if necessary. Check the soil amendments article to determine natural sources of minerals and pH amendments. Do not create a “perfect” hole that the tree’s roots will not leave. Make only critical amendments to a large area.