Garden Edging and Borders
Your best defense against grass creeping into your garden beds is to edge cut the beds. Installing a decorative border sill further enhance the gardens and landscape.

Where garden bed meets turf never remains a clean crisp edge. It doesn’t take very long before your lawn grass starts creeping into the bed, and spreading plants start creeping out. A properly created edge can be maintained if you are willing to do so, or you can install border edging that is much more maintenance free. Strictly speaking, there is a difference between just “creating an edge” and “installing border edging”. Border edging can be simple or elaborate to complement or enhance your gardens and landscape.
Creating and keeping fresh a simple edge to your gardens is accomplished manually with basic, or powered tools. Cutting in an edge on a new garden bed requires a bit of work, so it should be well planned before starting. Consider the size and design of the bed as well as the plant design. It is best to work on the layout with temporary marking such as laying out a garden hose or string to help you visualize how the bed will look. Even when you think you are satisfied, it is helpful to use a semi permanent marking, such as spray paint, to evaluate a bit longer. I like to “cut in” my boundary with a string trimmer and do my next lawn mowing around it. I have often adjusted the markings not only for a better visual design, but just as important, to accommodate easy mowing patterns. When I think I am satisfied I drop the mower blade to the lowest setting and “scalp” the bed area. I can get a better visual then and always wind up with adjustments after that. If you will be adding decorative border material after cutting in the edge, be sure to allow room for the material.

Once satisfied with the layout you are ready to cut in the edge. This requires cutting through the turf into the soil following the line you have created. This first cut, before creating a full trench and removing sod, is your last chance to alter the shape. A variety of tools can be used including a standard garden spade, half moon edger or a power edger. For a large project you may even want to rent a heavy duty gas powered edger that will make quick work of the job.

Cutting in a simple trench edge can be accomplished by stepping in your tool straight down through the sod until you reach soil. From the inside of the bed, cut into the soil at an angle toward the first outline cut, continuing around the entire bed. Now the sod clumps can be removed and you should have a nice V shaped trench. If this is a new bed, of course you may have all the interior sod to remove also. The edge of this trench can be kept neat and crisp with a string trimmer, and the trench will hold your garden mulch in place. Note: simple trenching on a sloped bed can cause some washout. Heavy rain will gush down the trench carrying your mulch with it. Using a border edging will reduce washout.
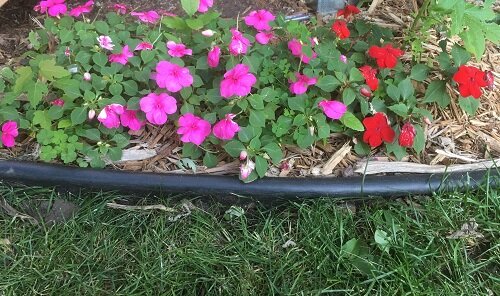
If you prefer to add a decorative border the depth and width of the edge cut will vary based on the material you select. A basic black plastic contractor edging is simple, neat and effective, and easily accommodates curves and slopes. And corner connectors are available for a neat square corner. The trench you dig needs to be as deep as the flange on the edging strip. You will want to install it just deep enough to expose about a half inch to an inch of the round edge above the turf line. This will hold mulch back and allow you to use your string trimmer along the edging. Depending on your mower configuration, you may be able to drop one wheel inside the edging and the blade will mow right to the edge. When you back fill the inside of the bed, allow some space for your mulch so it does not overflow into the lawn. Anchor any curves and connections with anchor stakes. This is all a bit of work so make it worthwhile and use a top quality contractor grade edging that will stand up for years and years. You will also see a variety of steel and metal edging at the big box stores. Make sure you install top quality if you are going to all the trouble of edging.

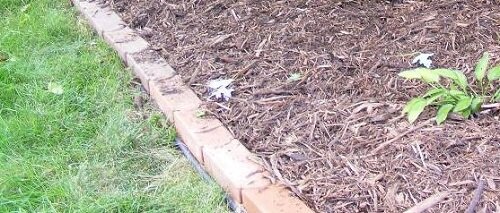
There are virtually unlimited materials you can use for a more decorative edge on your garden bed. Stone, block and brick edging is all durable and can compliment and enhance your landscape style. These should all be set in a deep, flat trench with a deep base of gravel to prevent shifting and heaving when the ground freezes and thaws. When properly installed it will last virtually forever and is easy to maintain neatly with a string trimmer.
Recycled materials are an economical choice and can be simple, creative and interesting, especially in a casual garden and landscape design. Old bricks are durable and can lend a classic look. Lumber, pallets or tree trunks can be cut uniformly to lay lateral on straight edges, or in varying lengths to be installed upright. Large stones, rocks or boulders create a natural look, but also require just a bit more tedious string trimming to keep neat. These materials should also be installed with a deep gravel base.

When possible the easiest “edge” to your bed is created by butting the garden up to an existing sidewalk or patio. Or install a new garden path of with paver stones. Or install an easy do-it-yourself garden path with contractor edging to contain pea gravel.
Be creative. See what kinds of materials are available to up cycle that will complement your garden design.