Straw Bale Gardening
Do not assume that you can just pop some plants into a straw bale. There are many stories about disappointed gardeners who did not follow just a few simple instructions to achieve a bountiful bale garden

After much research I plan to try straw bale gardening next spring. There is a LOT of information out there about straw bale gardening, but I want to focus on beginner information to get things started. The investment of time and money is minimal so there is little to lose and everything to gain by experimenting. If you should decide to straw bale garden every year or on a large scale it will be important for you to gather more information to become most efficient and productive. I would recommend picking up Joel Karsten’s book. He has developed a well respected and widely used system of bale gardening, and his book is jammed with tips, ideas and information for straw bale gardening from beginner to advanced.
Why would you want to straw bale garden? Well there are many advantages:
Easy, no digging, hauling soil and amendments and preparing soil
Eliminates the problem of poor, rocky, or clay soil
Eliminates the problem of no soil space
Inexpensive, you buy the bale but no soil. you buy conditioning fertilizer but no soil amendments and compost, you buy fertilizer to use through the season either way.
Your used bale is free compost or mulch at the end of the season bales can be placed anywhere you want and put in a different place every season if you want, you can plant extra early because the bales are much warmer much earlier than your soil
Disadvantages
Direct seeding can be more difficult, but not a real problem
Cool season crops are not highly successful in straw bales
How to get started with Straw Bale Gardening
BUY YOUR STRAW BALES
Do not buy your straw from a garden center unless you have discussed the origin and purpose of the bales with a knowledgeable employee.. It is often seeding hay or decorative hay and full of weed seeds, or full of chemicals. Hay is full of seeds, somewhat green, heavy and more expensive than straw. A straw bale will not contain seeds other than a stray here and there. I buy from a garden center that is familiar with bale gardening or the farm supply but you may be able to buy direct from a farm. The farm supply near me stocks the straw bales year round to accommodate bale gardening, so I can set up my bales in very early spring. I prefer not to put them out in fall to avoid housing mice or other critters.
When sourcing your straw bales, try to find bales that are bound tightly. some gardeners prefer a bio-degradeable jute twin holding the bale together. Some prefer something more weather sturdy like plastic baling twine since sometimes you can get 2 growing seasons out of a bale. The bales should have 2 or 3 strands of twine to hold the bale firm.
BALE PLACEMENT
You can put a straw bale garden any place you want as long as it will get a minimum of 6 hours of sun, more is certainly fine especially if you are growing tomatoes and peppers. If you want to set up your bale garden on a concrete patio or deck you may want to put the bales up on concrete blocks, but that is not necessary for the bale garden. If you want to set up your bale in the grass, you might want to put down landscape fabric to help minimize grass and weeds growing up into and through the bale and to create a “clear patch” for the bales to sit on and to mow around. And avoid low wet spots, your bales will be consistently soggy and drown the plants.
Arrange your bales for easy access to your plants and allow enough space to move and mow around. Bales butted up against each other, especially the long way, will help prevent moisture evaporation. There is a difference of opinion about whether the bales should be cut ends up or cut ends facing out. Both methods claim better water absorption and retention, Joel Karsten believes they should be placed cut ends up. The theories to consider: Cut ends facing up may decompose more quickly and prevent a second year’s use; and cut ends facing up with the twine on the sides will hold the bales together better and prevent cutting through one when you plant; and cut ends up will allow creating a planting pocket easier. I think I will defer to the guru Karsten.
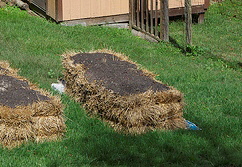
CONDITIONING THE BALES
When to start the conditioning process is a bit difficult to pin down. In the North, you should be able to begin conditioning as soon as the last of the snow has melted. Up here lately, that could be anywhere between March and May, so use your best judgement. The bales will warm up and accommodate early planting, so I will start mine as soon as the sun feels warm and the nights come up above freezing.
The conditioning process can take anywhere from 2 to 4 weeks to complete and allow for planting, but again according to our guru Karsten 2 weeks from start to planting. There are variables that can affect the speed of the process: Using inorganic (chemical) fertilizers will take 10-14 days; Using organic fertilizers will take 3 to 4 weeks; Warm temperatures will speed the process, cool temperatures will slow it (In cool weather you can wrap the bales in plastic to accelerate the decomposition); and the bales may take as long as 2 or 3 weeks to cool enough for planting. (I will make note of my timeline next spring)
Apply fertilizer on days 1, 3 and 5, watering it into the bale. Use 3 cups of organic fertilizer per bale or ½ cup ammonium nitrate. A high nitrogen fish emulsion or blood meal would be good choices.
Water thoroughly on days 2, 4 and 6.
Apply fertilizer on days 7, 8 and 9 using 1 ½ cups of organic fertilizer per bale or ¼ cup ammonium nitrate. Water thoroughly.
On day 10 apply 3 cups of phosphorous and potassium (use half fish meal or bone meal with half potash)
The bales should be getting good and hot by now, keep them moist. You may start to seem little black specks from the decomposition. That’s a good thing! “Things” like mushrooms sprouting is good too!
Check the heat daily and as soon as you can stick your hand into the bale without feeling hot, it is time to plant. But only if all danger of frost has passed or you have a means of tenting the bales.
PLANTING IN CONDITIONED STRAW BALES
The size of straw bales can vary, but often they are about 15” x 30”. Plan ahead for the number of plants you can grow in each bale. Root crops like radish and carrots will not do well at all in straw bales. And extra tall plants line corn or giant sunflowers can topple the bale.
2-3 tomatoes
4-6 lettuce plants
4-6 cucumbers
3-4 strawberries
2-3 zucchini or summer squash
4 peppers
For other seeds and starter plants just follow standard planting instructions.

Depending on what you plan to grow, you may want to install a trellis before you plant. You can use tall garden stakes pushed into the ground at the ends of the bales and use trellis netting between them. Tomato cages or stakes can be pushed right into the bales.
Starter plants can be popped right into the bale. Just create a hole by separating the straw with a trowel. You can cover the roots with a little potting mix.
Seeds will need a bed of soil. Cover the top of the straw bale with about 2 inches of a good planting mix or potting soil then plant your seeds as usual.
Adding a few flowers around the perimeter of the bale or planted into the sides would be a nice touch.
If you generally use soaker hoses for your gardens, which you should, lay the hoses right over the bales. The bales should be kept moist just like your gardens. And although straw bales are a great medium for growing, there is not a lot of nutrients for your plants. So do fertilize weekly with a balanced N-P-K water soluble fertilizer, ideally one that also contains micro nutrients. Monitor your plants for yellowing leaves, the decomposition of the bales can cause nitrogen deficiency.
Voila! Done! And after the harvest you will have soggy old gray bales perfect for composting or for mulching the rest of your gardens.